¶ M.2 M-KEY 2280 SSD
准备一块 M.2 E-KEY 2280 规格的 SSD
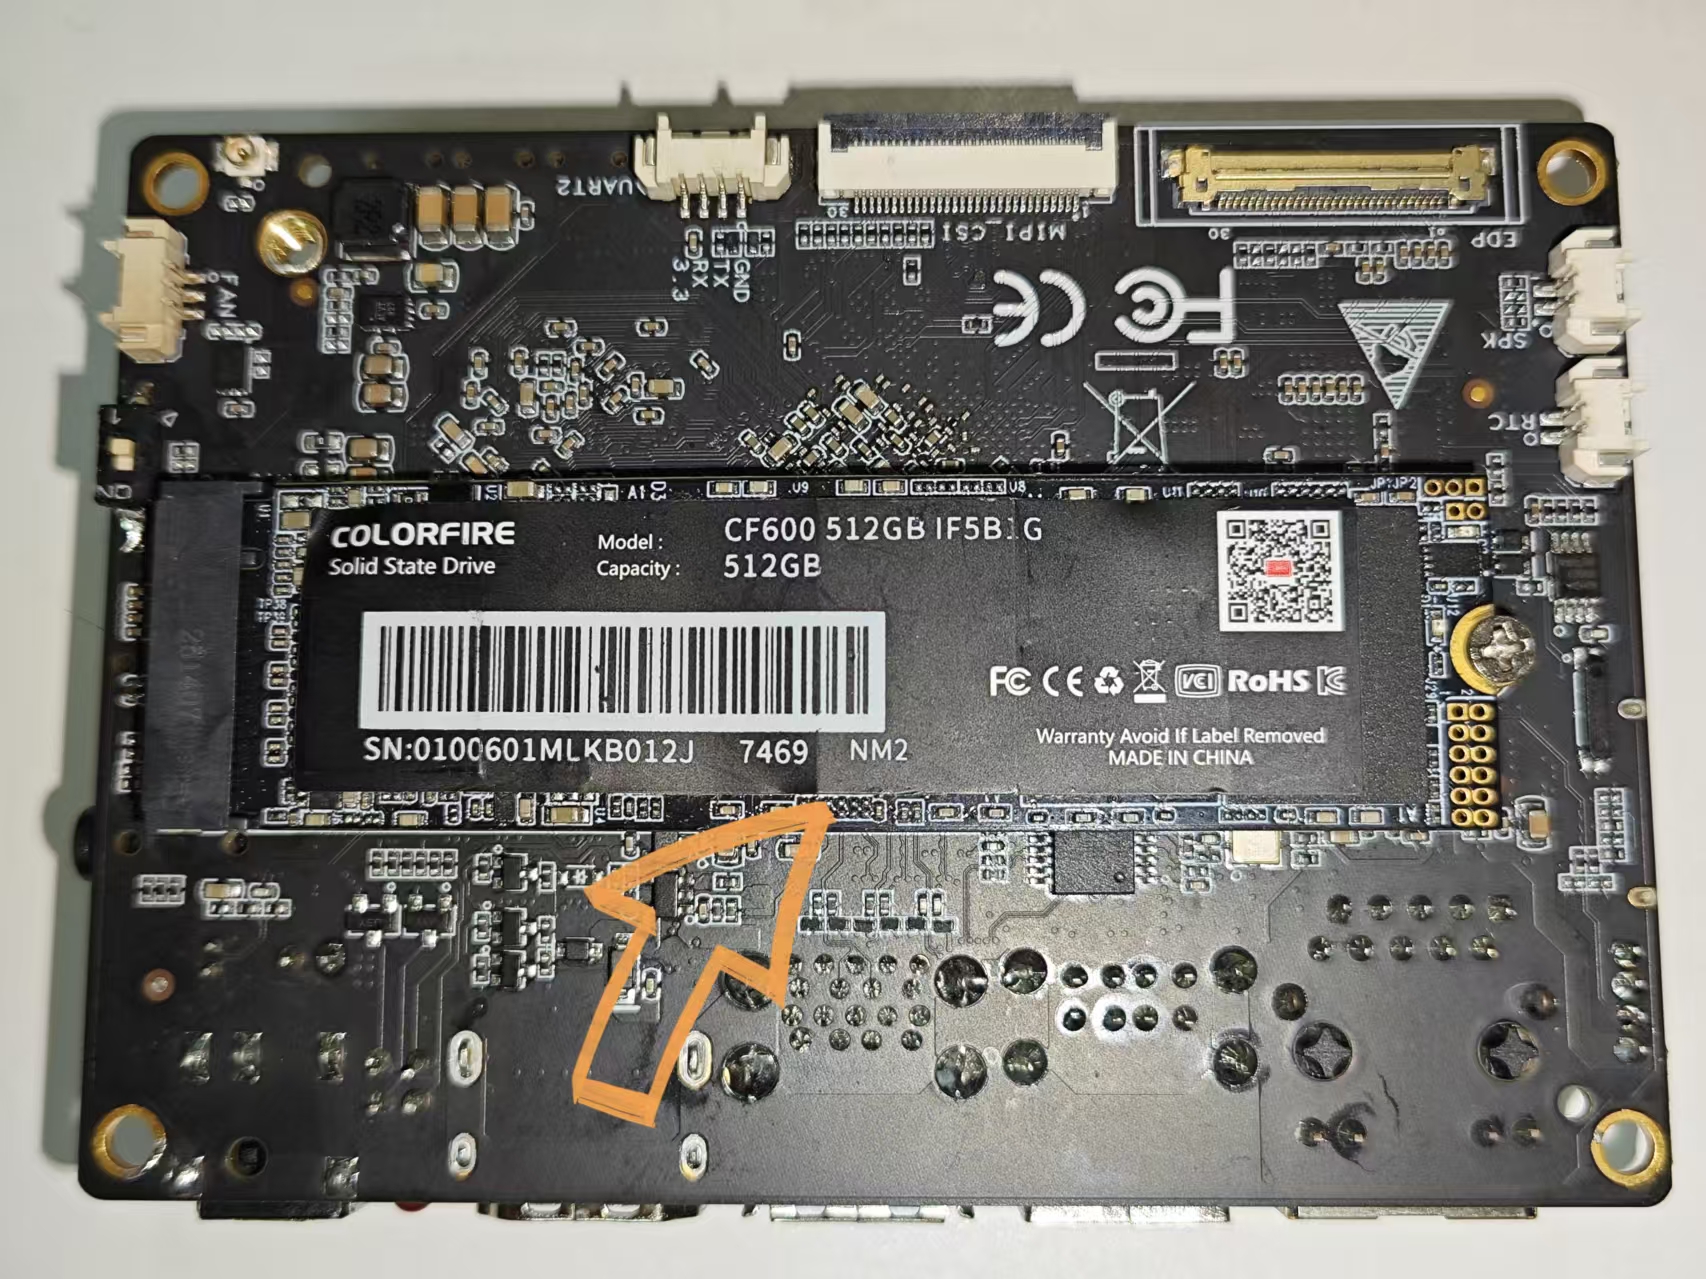
youyeetooRJ 开发板上有 1 个 PCIe3.0 x 2 接口,可以插入支持 NVME 协议的 M.2 M-KEY 2280 SSD 进行使用,如图:
¶ 1 实物图
¶ 2 将磁盘挂载到文件系统中
¶ 2.1 手动挂载
# 查看
$ sudo fdisk -l
...
Disk /dev/nvme0n1: 476.94 GiB, 512110190592 bytes, 1000215216 sectors
Disk model: CF600 512GB
Units: sectors of 1 * 512 = 512 bytes
Sector size (logical/physical): 512 bytes / 512 bytes
I/O size (minimum/optimal): 512 bytes / 512 bytes
Disklabel type: dos
Disk identifier: 0x3a6ba98f

Device         Boot Start        End    Sectors   Size Id Type
/dev/nvme0n1p1       2048 1000215215 1000213168 476.9G 83 Linux
...

# 挂载
mkdir -p /mnt/ssd
sudo mount /dev/nvme0n1p1 /mnt/ssd
¶ 2.2 自动挂载
¶ 2.2.1 获取设备的 UUID
### 查看设备的UUID
$ sudo blkid /dev/nvme0n1
$
### 如果没有输出 UUID 说明没有进行分区(如果有的话,可以直接跳到`再次查看设备的UUID`)
### 检查分区情况
$ sudo fdisk -l /dev/nvme0n1
Disk /dev/nvme0n1: 476.94 GiB, 512110190592 bytes, 1000215216 sectors
Disk model: CF600 512GB
Units: sectors of 1 * 512 = 512 bytes
Sector size (logical/physical): 512 bytes / 512 bytes
I/O size (minimum/optimal): 512 bytes / 512 bytes
### 如果输出这种信息,没有类似于/dev/nvme0n1p1这样的分区,意味着没有分区
### 创建分区(在这里我们创建一个主分区作为演示)
$ sudo fdisk /dev/nvme0n1

Welcome to fdisk (util-linux 2.38.1).
Changes will remain in memory only, until you decide to write them.
Be careful before using the write command.

Device does not contain a recognized partition table.
Created a new DOS (MBR) disklabel with disk identifier 0x3a6ba98f.

Command (m for help): n
Partition type
   p   primary (0 primary, 0 extended, 4 free)
   e   extended (container for logical partitions)
Select (default p): p
Partition number (1-4, default 1):
First sector (2048-1000215215, default 2048):
Last sector, +/-sectors or +/-size{K,M,G,T,P} (2048-1000215215, default 1000215215):

Created a new partition 1 of type 'Linux' and of size 476.9 GiB.

Command (m for help): w
The partition table has been altered.
Calling ioctl() to re-read partition table.
Syncing disks.
### 将刚刚创建好的分区格式化为ext4格式
$ sudo mkfs.ext4 /dev/nvme0n1p1
mke2fs 1.47.0 (5-Feb-2023)
Discarding device blocks: done
Creating filesystem with 125026646 4k blocks and 31260672 inodes
Filesystem UUID: d068a5fd-b7bb-4f80-86dd-aa6a036f86d9
Superblock backups stored on blocks:
        32768, 98304, 163840, 229376, 294912, 819200, 884736, 1605632, 2654208,
        4096000, 7962624, 11239424, 20480000, 23887872, 71663616, 78675968,
        102400000

Allocating group tables: done
Writing inode tables: done
Creating journal (262144 blocks): done
Writing superblocks and filesystem accounting information: done


### 再次查看设备的UUID
$ sudo blkid /dev/nvme0n1p1
/dev/nvme0n1p1: UUID="d068a5fd-b7bb-4f80-86dd-aa6a036f86d9" BLOCK_SIZE="4096" TYPE="ext4" PARTUUID="3a6ba98f-01"
¶ 2.2.2 编辑/etc/fstab文件
$ cat /etc/fstab
...
UUID="d068a5fd-b7bb-4f80-86dd-aa6a036f86d9" /mnt/ssd ext4 defaults 0 2
¶ 2.2.3 挂载并验证
### 挂载
$ sudo mount -a
mount: (hint) your fstab has been modified, but systemd still uses
       the old version; use 'systemctl daemon-reload' to reload.
### 验证(可以看到已经挂载成功)
$ df -h
文件系统        大小  已用  可用 已用% 挂载点
...
/dev/nvme0n1p1  469G   28K  445G    1% /mnt/ssd
$ sudo lsblk
NAME         MAJ:MIN RM   SIZE RO TYPE MOUNTPOINTS
...
nvme0n1      259:0    0 476.9G  0 disk
└─nvme0n1p1  259:1    0 476.9G  0 part /mnt/ssd
$ cat /proc/mounts  | grep nvme
/dev/nvme0n1p1 /mnt/ssd ext4 rw,relatime 0 0
### 重启再验证
¶ 3 读写测速
| 协议\插槽 | x1 | x2 | x4 | x8 | x16 |
|---|---|---|---|---|---|
| PCIe 1.0 | 250MB/s | 500MB/s | 1GB/s | 2GB/s | 4GB/s |
| PCIe 2.0 | 500MB/s | 1GB/s | 2GB/s | 4GB/s | 8GB/s |
| PCIe 3.0 | 1GB/s | 2GB/s | 4GB/s | 8GB/s | 16GB/s |
| PCIe 4.0 | 2GB/s | 4GB/s | 8GB/s | 16GB/s | 32GB/s |
由表可知PCIe3.0 x 2 的传输速率最高达到 2 GB/s
¶ 3.1 使用 dd 命令进行读写测试
### 向磁盘写入 1GB 的数据
$ sudo dd if=/dev/zero of=/dev/nvme0n1p1 bs=1M count=1024 oflag=direct

### 读取磁盘 1GB 文件
$ sudo dd if=/dev/nvme0n1p1 of=/dev/null bs=1M count=1024 iflag=direct
¶ 3.2 使用 fio 命令进行读写测试
$ sudo apt update
$ sudo apt install fio

### 顺序写入性能测试
$ fio --name=seqwrite --ioengine=sync --rw=write --bs=1M --numjobs=1 --size=10G --runtime=60s --time_based --output-format=normal --direct=1 --filename=/dev/nvme0n1p1

### 顺序读取性能测试
$ fio --name=seqread --ioengine=sync --rw=read --bs=1M --numjobs=1 --size=10G --runtime=60s --time_based --output-format=normal --direct=1 --filename=/dev/nvme0n1p1

### 随机写入性能测试
$ fio --name=randwrite --ioengine=sync --rw=randwrite --bs=4k --numjobs=8 --size=10G --runtime=60s --time_based --output-format=normal --direct=1 --filename=/dev/nvme0n1p1

### 随机读取性能测试
$ fio --name=randread --ioengine=sync --rw=randread --bs=4k --numjobs=8 --size=10G --runtime=60s --time_based --output-format=normal --direct=1 --filename=/dev/nvme0n1p1

### 测试多线程性能
$ fio --name=multiwrite --ioengine=sync --rw=write --bs=1M --numjobs=16 --size=10G --runtime=60s --time_based --output-format=normal --direct=1 --filename=/dev/nvme0n1p1

### 读取与写入混合测试(进行 50% 读取和 50% 写入的混合测试)
$ fio --name=mixedreadwrite --ioengine=sync --rw=randwrite --bs=4k --numjobs=4 --size=10G --runtime=60s --time_based --output-format=normal --direct=1 --filename=/dev/nvme0n1p1
¶ 说明:
--filename=/dev/nvme0n1p1:指定测试磁盘设备为/dev/nvme0n1p1。--direct=1:启用直接 I/O,绕过文件系统缓存,直接与磁盘交互。--size=10G:测试的文件大小为 10GB。
¶ 3.3 使用 hdparm 命令进行读写测试
$ sudo apt install hdparm
### 测试顺序读取性能
$ sudo hdparm -t --direct /dev/nvme0n1p1
### 测试缓存读取性能
$ sudo hdparm -T /dev/nvme0n1p1
¶ 3.4 使用 ioping 命令进行读写测试
$ sudo apt install ioping
### 测试磁盘的读取性能(ioping 默认测试的是 磁盘读取延迟。)
$ ioping -c 10 /dev/nvme0n1p1
### 测试磁盘的写入性能(ioping 还可以用来测试磁盘的写入延迟)
$ ioping -c 10 -W /dev/nvme0n1p1
### 测试持续的 I/O 性能
$ ioping -c 1000 -t /dev/nvme0n1p1
¶ 3.5 使用 stress-ng 工具进行读写测试
$ sudo apt install stress-ng
### 测试磁盘的顺序写入性能
$ stress-ng --io 1 --blocksize 1M --timeout 60s --write --verify --fsync --name seqwrite --device /dev/nvme0n1p1
### 测试磁盘的顺序读取性能
$ stress-ng --io 1 --blocksize 1M --timeout 60s --read --verify --name seqread --device /dev/nvme0n1p1
### 测试磁盘的随机写入性能
$ stress-ng --io 8 --blocksize 4k --timeout 60s --write --verify --random-ops --name randwrite --device /dev/nvme0n1p1
### 测试磁盘的随机读取性能
$ stress-ng --io 8 --blocksize 4k --timeout 60s --read --verify --random-ops --name randread --device /dev/nvme0n1p1
### 测试混合负载(读写混合)
$ stress-ng --io 8 --blocksize 4k --timeout 60s --verify --name mixedreadwrite --random-ops --mix 50 --device /dev/nvme0n1p1
### 测试多个线程的并发 I/O 性能
$ stress-ng --io 16 --blocksize 1M --timeout 60s --write --verify --name multiwrite --device /dev/nvme0n1p1
¶ 3.6 使用 bonnie++ 工具进行读写测试
$ sudo apt install bonnie++
### 顺序写入性能测试
$ bonnie++ -d /mnt/ssd -s 10G -r 5G -w
### 顺序读取性能测试
$ bonnie++ -d /mnt/ssd -s 10G -r 5G -r
### 随机写入性能测试
$ bonnie++ -d /mnt/ssd -s 10G -r 5G -n 128 -w
### 随机读取性能测试
$ bonnie++ -d /mnt/ssd -s 10G -r 5G -n 128 -r
### 综合测试(顺序和随机读写)
$ bonnie++ -d /mnt/ssd -s 10G -r 5G
¶ 4 DEMO1:监控磁盘容量、发送警报邮件
#!/bin/bash

# 提取根分区剩余空间
disk_size=$(df /dev/nvme0n1p1 | awk '/\//{print $4}')
# 注意磁盘提取的空间大小都是以 Kb 为单位
if  [  $disk_size -lt 512000 -a $mem_size -lt 1024000  ]
then
        echo "Insufficient resources" | mail -s Warning 邮箱
fi

# 添加到crontab里面(每十分钟执行一次)
*/10 * * * * /path/to/nameOfScript