¶ openCV编程
OpenCV(Open Source Computer Vision Library)是一个开源的计算机视觉和机器学习库,包含数千种算法,支持图像/视频处理、目标检测、人脸识别等功能。本文介绍一下如何在 android app 中使用openCV
¶ 下载openCV SDK
下载地址为
这里下载最新版本即可。笔者这里用的是 opencv-4.11.0 版本,下载之后解压,得到如下内容

¶ 创建工程并导入openCV SDK
创建一个名为 OpenCVTest 的工程,创建工程,以及签名的方法可以参考
然后添加openCV SDK到工程,打开 Import Module
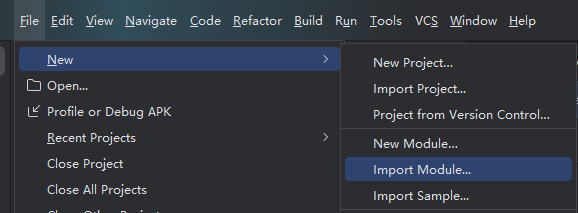
选择上一步解压出来的sdk目录

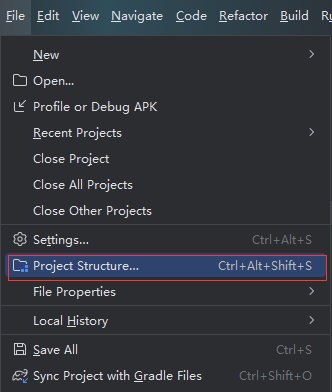
然后打开 Project Structure
点击这个加号添加Module依赖
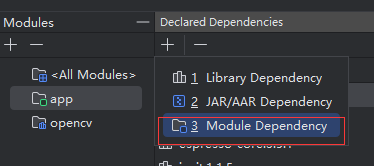
选中opencv

¶ 编写预览摄像头画面的代码
MainActivity的源码修改如下
package com.example.opencvtest;

import org.opencv.android.CameraActivity;
import org.opencv.android.CameraBridgeViewBase;
import org.opencv.android.CameraBridgeViewBase.CvCameraViewFrame;
import org.opencv.android.CameraBridgeViewBase.CvCameraViewListener2;
import org.opencv.android.OpenCVLoader;
import org.opencv.core.Mat;

import android.os.Bundle;
import android.util.Log;
import android.view.SurfaceView;
import android.view.WindowManager;

import java.util.Collections;
import java.util.List;

public class MainActivity extends CameraActivity implements CvCameraViewListener2 {
    private static final String TAG = "OpenCVCamera";
    private CameraBridgeViewBase mOpenCvCameraView;

    @Override
    protected void onCreate(Bundle savedInstanceState) {
        super.onCreate(savedInstanceState);
        getWindow().addFlags(WindowManager.LayoutParams.FLAG_KEEP_SCREEN_ON);

        setContentView(R.layout.activity_main);

        mOpenCvCameraView = (CameraBridgeViewBase) findViewById(R.id.preview);
        mOpenCvCameraView.setVisibility(SurfaceView.VISIBLE);
        mOpenCvCameraView.setCvCameraViewListener(this);
    }

    @Override
    protected void onResume() {
        super.onResume();
        if (!OpenCVLoader.initDebug()) {
            Log.e(TAG, "OpenCV initialization failed!");
        } else {
            Log.d(TAG, "OpenCV initialized successfully");
            mOpenCvCameraView.enableView();
        }
    }

    @Override
    protected void onPause() {
        super.onPause();
        if (mOpenCvCameraView != null) {
            mOpenCvCameraView.disableView();
        }
    }

    @Override
    protected void onDestroy() {
        super.onDestroy();
        if (mOpenCvCameraView != null) {
            mOpenCvCameraView.disableView();
        }
    }

    @Override
    protected List<? extends CameraBridgeViewBase> getCameraViewList() {
        return Collections.singletonList(mOpenCvCameraView);
    }

    @Override
    public void onCameraViewStarted(int width, int height) {
        Log.i(TAG, "Camera view started with width: " + width + ", height: " + height);
    }

    @Override
    public void onCameraViewStopped() {
        Log.i(TAG, "Camera view stopped");
    }

    @Override
    public Mat onCameraFrame(CvCameraViewFrame inputFrame) {

        return inputFrame.rgba(); // 返回彩色图像
    }
}
layout中添加一个framelayout用于显示预览。这里默认占满整个画面,可以根据需要调整
<?xml version="1.0" encoding="utf-8"?>
<androidx.constraintlayout.widget.ConstraintLayout xmlns:android="http://schemas.android.com/apk/res/android"
    xmlns:app="http://schemas.android.com/apk/res-auto"
    xmlns:tools="http://schemas.android.com/tools"
    android:layout_width="match_parent"
    android:layout_height="match_parent"
    tools:context=".MainActivity">

    <FrameLayout
        xmlns:opencv="http://schemas.android.com/apk/res-auto"
        android:layout_width="match_parent"
        android:layout_height="match_parent">
        <org.opencv.android.JavaCameraView
            android:id="@+id/preview"
            android:layout_width="match_parent"
            android:layout_height="match_parent"
            opencv:camera_id="any"
            opencv:show_fps="true" />
    </FrameLayout>

</androidx.constraintlayout.widget.ConstraintLayout>
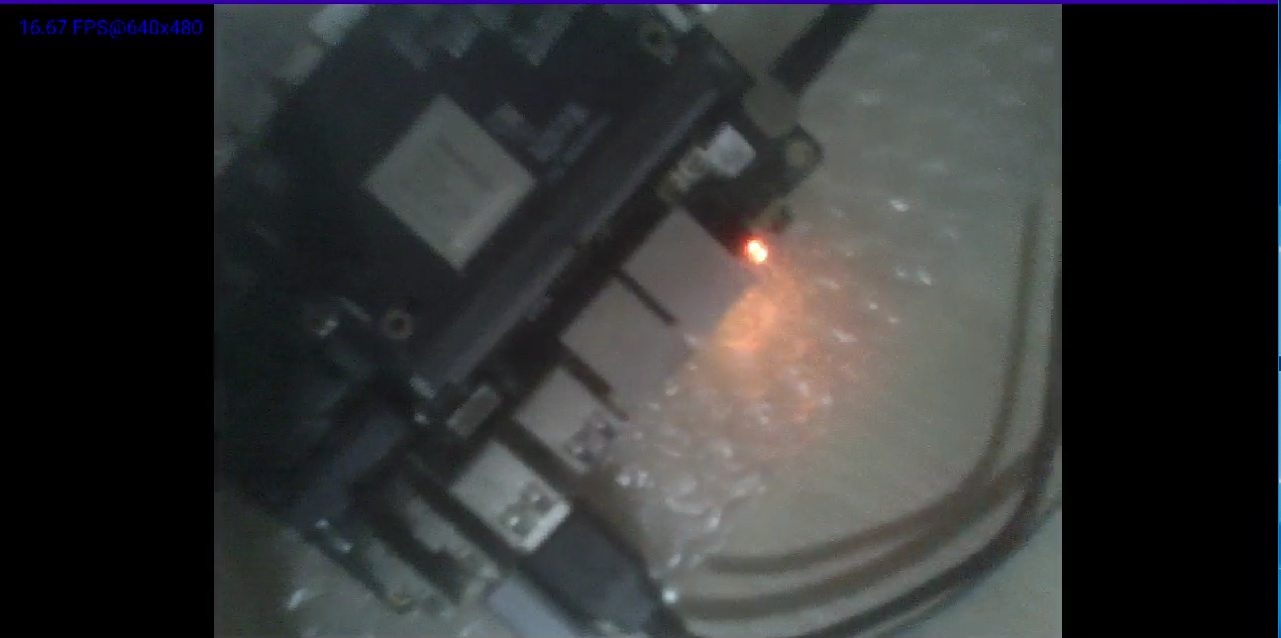
构建后放到板上运行,可以看到摄像头画面